Getting Started
Prepare
- Raspberry Pi 3B+ with SD card (>=16GB), 2 pcs.
- ALFA Netowrk's 802.11ah PiHAT module -- AHPI7292S, 2 pcs.
- Antennas for 802.11ah frequencies, 2 pcs.
- RPi images with NRC7292 drivers and tools for 802.11ah field tests
- Halow_RPi_base.img (Default role: AP). >> DOWNLOAD <<
Note
For Pi 4 cases, please goto to the page: Getting Started New, for Pi4
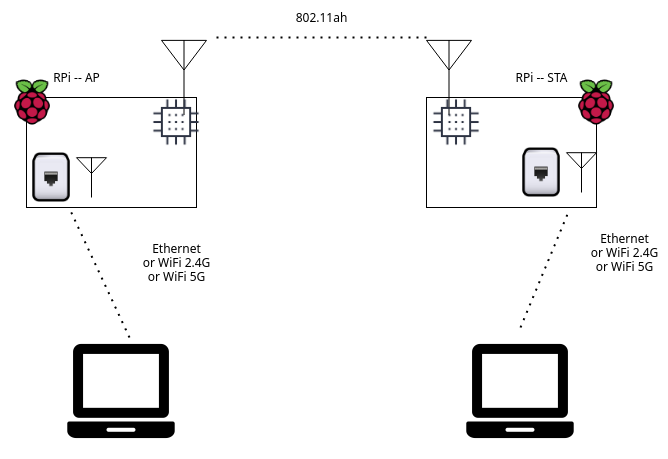
Network Topology
Installation
Step 1. Flash SD cards for RPi
First, we need to flash two SD cards with dedicated image, one for client and another for AP.
For common users, we recommand using Raspberry Pi's official tool, Raspberry Pi Imager, to flash the SD cards.
You can download the software here:
and follow its step-by-step tutorial youtube video to flash SD cards:
How to use Raspberry Pi Imager
Step 2. Install SD cards to RPi and power on the devices
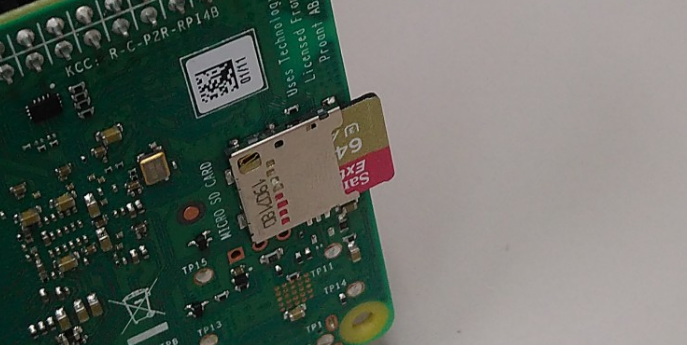
Insert the SD card to Raspberry Pi's slot, and then power on the board by micro-USB power plug.
Step 3. Access RPi and update configuration
The RPi instance has static IP: 192.168.1.1 on ethernet port by default with ssh enable. Prepare a PC/NB with static IP in the same subnet, ex: 192.168.1.2, and access RPi via ssh and RJ-45 wire.
Default connection profile is:
| Host | 192.168.1.1 |
| Port | 22 |
| Username | pi |
| Password | raspberry |
After enter PRi via ssh, please edit /etc/nrc.conf file and update parameters to fit your testing scenario. Here list some frequently used parameters below:
| country_code | US EU JP KR KR-MIC TW |
| channel | See UG-7292-003-S1G_Channel.pdf to find proper channel index |
| role | ap sta |
After changing /etc/nrc.conf, remember to execute nrc_reload command and reboot to apply configurations.
Step 4. Check the wireless network connections
Prepare two RPi instance throungh steps 1. to step 3., one for ap role and another for sta role.
After setup and boot on RPi instances, they will broadcast WiFi SSIDs in following format:
Halow_RPi_<MAC address last 6 characters> (ex: Halow_RPi_a1b2c3)
with RPi's built-in WiFi.
The ap and sta RPi instances are expected to establish a wireless LAN through WiFi WDS mode:
| Subnet | 192.168.200.0/24 |
| Server IP | 192.168.200.1 (by ap role) |
| DHCP server | on ap role |
| SSID | Halow_RPi_<MAC address last 6 characters> (each instance has its own SSID) |
| SSID for 802.11ah | Halow_world |
| WDS | enable |
| Bridge config | Built-in WiFi(802.11n), WiFi Hallow(802.11ah) are in the same LAN (nrc0, nrc1, wlan0) |
- Power on both AP, STA devices and wait around 1~3 mins to make sure AP and STA establishing the 802.11ah WDS mutual connection.
- Connect from a notebook(named as NB1) to AP device via 802.11n WiFi, it's expected notebook will get 192.168.200.x IP via DHCP automatically
- Connect another notebook(named as NB2) to STA device, it's expected NB2 will get 192.168.200.x IP via DHCP automatically
- Lookup IP address of both NB1 and NB2, and let them
pingeach other.
If ping tests OK, then 802.11ah wireless is confirmed to work properly.
Note
Remember to check your computer's firewall settings to make sure it allows ICMP packet send/recv. Some OSes (ex: Windows) block ICMP packets by default.
Configuration
How to change channel
At first, look into the Newracom's offcial document about 802.11ah channel list tables:
and find required parameters:
- The target country, like:
US - The target frequency band index, like:
116 - The corresponding 2.4G/5G frequency, like:
5580
Update RPi's /etc/nrc.conf with new parameters and reboot to apply new configuration.
NOTES:
- Channel index are not consistent among differewnt countries.
- Need both [country_code, channel index] to resolve the target frequency
Channels test pass
| bandwidth | channel idx | freq | 2.4G/5G freq |
|---|---|---|---|
| 4 | 116 | 926 | 5580 |
| 2 | 161 | 925 | 5805 |
| 4 | 162 | 910 | 5810 |
Channels test failed
| bandwidth | channel idx | freq | 2.4G/5G freq |
|---|---|---|---|
| 2 | 2 | 903 | 2417 |
| 2 | 153 | 909 | 5765 |
| 2 | 160 | 923 | 5800 |
How to set MCS manually
Run commands below:
cli set rc off
cli test mcs 10
Change the value 10 to the target MCS value you want.
NOTE:
rcmeans "Rate Control". Need to turn off rate control before setting static MCS value- MCS value is in range from
0to7and10
How to test performance
AP's image has iperf3 server by default. Users can just run the following command on RPi for speedtest:
iperf3 -c 192.169.200.1
How to scan
sudo iw nrc0 scan